What if we told you there was a wilderness survival technique that was easy to use, efficient, and produced very little smoke? Would you be interested? This technique is called the Dakota fire hole, and it can help you cook food over a fire easily and in any weather condition. In this article, we will discuss what a Dakota fire hole is, the benefits of using one, and how to make your own. So read on to learn more about this amazing survival tool.
What is a Dakota Fire Hole?
The Dakota fire hole is a simple yet effective way to build a fire. It gets its name from the Dakota tribe, who were known for their hunting and survival skills. It is also sometimes referred to as a Dakota fire pit.
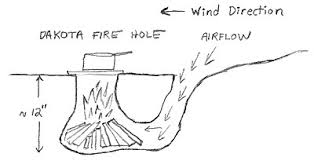
The Dakota fire hole consists of two holes: one for the fire and one for oxygen. The holes are connected by a tunnel, which allows fresh air to flow into the fire. The fire burns hot and efficiently in the oxygen-rich environment and produces very little smoke.
Benefits of Dakota Fire Holes
There are many benefits to using Dakota fire holes:
- Easy to cook over: You can simply place a pot or pan over the fire hole to cook food.
- Burns at a high temperature: The Dakota fire hole burns hotter than a traditional fire and is ideal for cooking.
- Efficient burning fire: The Dakota fire hole requires less wood, making it more efficient than a traditional fire.
- Makes very little smoke: The Dakota fire hole flame produces less smoke because the oxygen supply is controlled. This is ideal for survival situations, as it will not attract attention.
- Good in windy conditions: The Dakota fire hole is also good in windy conditions, as the oxygen supply can be regulated.
How to Build a Dakota Fire Hole
Making a Dakota fire hole is simple and only requires a few steps:
Location
Choose a location for your fire hole. It should be away from any flammable materials, such as leaves or grass.
Dry, compact soil is ideal. You should avoid rocks and roots.
Dig Fire Chamber
Dig a hole for your fire. The hole should be about one foot wide and two feet deep.
Dig Oxygen Supply Chamber
Next, dig a small hole next to the fire hole. This will be used as an oxygen supply. The air hole should be about six inches wide and one foot deep.
Make Connection Tunnel
Connect the fire hole and oxygen supply hole with a tunnel. The tunnel should be about two feet long and eight inches wide.
Start the Fire
Place some tinder in the fire hole and light it. Then, gradually add sticks to keep the fire going.
FAQs
What do I do with the dirt dug from the holes?
Once you have finished digging the hole, you should keep the dirt on hand as a way to extinguish the fire and cover up any trace of your campsite.
How do you cook on a Dakota hole fire?
You can cook on the Dakota fire pit by placing a cooking pot or pan over the top of the hole. You can also place mesh or green sticks over the hole to create a makeshift grill.
What can I use for cooking on a Dakota fire hole if I don’t have proper cooking pots and pans?
If you don’t have cooking pots and pans, you can use anything that will hold up to the heat and not catch fire. This includes a flat rock, green sticks, and even metal cans.
Can I use a Dakota fire hole if there is a fire ban since it is underground?
There may be fire bans in place in some areas due to dry conditions. If there is a fire ban in effect, you should not use a Dakota fire hole.
Conclusion
The Dakota fire hole is a simple yet effective way to build a fire and makes an excellent addition to your survival skills. It is easy to use, efficient, and produces very little smoke. If you are looking for a survival tool that can help you in any situation, the Dakota fire hole is a perfect choice.


I recently saw on a TV show where they used an existing animal borrow. Just make sure it’s unoccupied, judge the direction and dig down about 1′-2′ from the entrance. Looked like it could save some time.
can we say “earth bermed rocket stove”? 🙂