You may find yourself needing a portable camping toilet for several reasons. Some camping toilets are pleasant, and some camping toilets are not.
Whatever the reason, a DIY portable camp toilet may come in handy someday. You can build a comfy, DIY camping toilet with a bit of effort and an assortment of parts.
The Basic Concept.
Every portable camp toilet is essentially a bucket with a seat on top. Manufactured toilets can be expensive and flimsy. They may look like an actual toilet, but they are still just a bucket with a seat.
You can achieve this arrangement on your own and save money.
Design Options.
As with any DIY project, the design is limited only by your imagination. The most basic design is just a bucket and a pool noodle.
A more complex design may include a frame, an actual toilet seat, and a T-Paper dispenser. We will look at a few possible designs. You can develop your toilet from one of these ideas or create a new design from any materials you have available.
The Essential Components.
The only component common in all designs is a 5-gallon bucket with a sealing lid. An old 5-gallon paint bucket will work fine. Be sure the lid still fits well.
A tight-fitting lid is essential to keep the odors in and the flies out. All 5-gallon buckets are approximately 14 inches tall and 12 inches in diameter.
The dimensions of buckets from different manufacturers can vary slightly.
The Simplest Design – A Bucket and Foam Tube.
You can build a functional camp toilet with a bucket and a foam tube used as a cushion. A foam pool noodle or a length of thick-walled pipe insulation tube will work.
Cut a 36-inch length of the tube. Slice the tube open lengthwise on one side. A pipe insulation tube may already be sliced. Open the slice and slip the tube over the rim of the bucket.
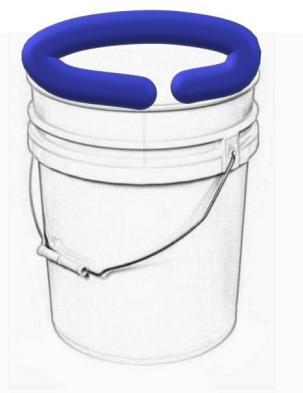
If you use a liner bag, place it in the bucket first. Wrap the bag over the bucket rim and use the tube to hold it in place. The tube will need to be removed after use to put the lid in place.
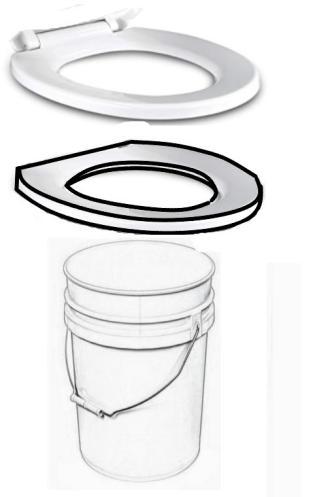
Toilet Seat Directly On the Bucket Design.
You will need a piece of plywood and an actual toilet set for this project. A wood seat works best. The plywood ring will be mounted under the toilet seat to act as a centering device.
Steps:
- Remove the lid from the seat assembly.
- Place seat on plywood.
- Trace seat shape on plywood.
- Place top of the bucket on plywood. Center it within the seat shape.
- Trace the bucket top on plywood.
- Use a jigsaw to cut out the plywood along tracings.
- Sand the edges of the plywood ring.
- You will have a ring that will fit over the bucket top and under the seat.
- Attach the ring to the underside of the seat using glue or screws.
- If using glue, sand the paint off the underside of the seat so the glue will adhere.
- If you use glue, wait until it is dry before proceeding.
- Paint exposed plywood to protect it from moisture.
- Re-attach lid to seat.
You now have a toilet seat topped camp toilet. If you use a liner bag, insert it before installing the seat assembly. Wrap the top of the bag over the bucket rim, and the seat assembly will hold it in place.
Sealing the Seat.
A ring of adhesive-backed insulation foam under the lid will seal it sufficiently for outdoor use. It will keep out flies and retain most of the odor. Remove the seat assembly and install the bucket top to move the toilet.
Frame Supported Seat.
The most involved style of portable camp toilet utilizes a frame that supports the seat assembly. The seat will be more stable. Sealing the seat and lid against the bucket will be a challenge.
An effective seal between the bucket top and the seat will require some precision construction.
Material Selection.
You can construct your frame from whatever material you are most comfortable working with. Wood or 2-inch Schedule 40 PVC pipe is the most common material used. Both are inexpensive and easy to work with.
Steps:
- Build the seat support wide enough and tall enough to accommodate the bucket.
- The top of the frame should be the same height as the bucket.
- The structure of the frame is entirely up to you.
- For the initial frame construction, make legs a little too long. You will trim them later.
- Here is a proposed frame design:
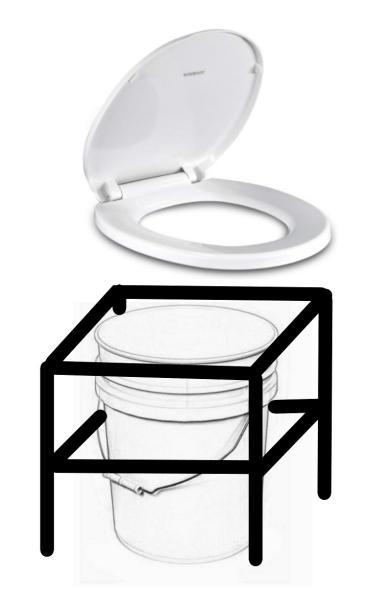
- Mount the seat to the top of the frame using screws.
- If you screw from the top of the seat, countersink the screw heads for comfort.
- If you attach the seat with screws from under the frame, ensure that screws do not protrude through the seat.
- With the seat attached, place the bucket under the assembly.
- Trim the length of the legs to best match bucket top to underside of the seat.

Using Your Camp Toilet.
The use of a camp toilet can be a learning experience. There are many opinions on best practices. You will develop your preferred system for using the toilet. Here are a few items to consider when using your toilet.
Bucket Liner.
Most folks use biodegradable trash bags for their toilet. These environmentally friendly trash bags will break down in a short time. A regular bag can last many years without breaking down, as opposed to a biodegradable trash bag.
Be sure to have enough of these garbage bags around, but, a word of warning about biodegradable bags: do not buy in bulk. They will start to break down in the box before you use them.
Also, do not leave a biodegradable bag in your bucket for more than one day. Acidity in urine accelerates the breakdown process.
Absorbent Materials.
Use sawdust, cat litter, or coffee grounds to absorb moisture and help control odors. Do not use clay litter. They tend to be considerably heavier than wood pulp litter. There is no best material. Experience will help you decide if the litter is a benefit or not.
Camping Toilet Chemical Treatments.
There are several camp toilet treatments on the market. Some accelerate the breakdown of waste materials. Others cause clumping to assist in the disposal of material. These treatments work well but are fairly expensive.
Two Bucket System.
Using Urine and Feces buckets is a rare but reasonable practice. Disposing of urine is simple. If urine is diluted with water or spread over a moderate area, urine is beneficial to plants. Feces, on the other hand, must be appropriately disposed of. Feces must be buried or delivered to a waste transfer site.
Toilet Paper.
You certainly don’t want to forget toilet paper. Consider how you will be disposing of the toilet paper, and if you should get biodegradable toilet paper for that reason. You could also make a DIY toilet paper holder or dispenser to carry along with a portable toilet.
Last Thoughts.
A DIY portable camp toilet can make life more comfortable when no plumbing is available. When properly set up and maintained, a camp toilet can be a safe and ecologically sound way to manage human waste.
A DIY camping toilet is an easy project if you need a portable camp toilet. It will save you some money and make life a little more comfortable.
[lasso rel="emergency-preparedness-more-a-manual-on-food-storage-and-survival-2nd-edition-revised-and-updated" id="35334"]