A worst-case scenario pops up after SHTF, and you’re in a disadvantageous terrain.
Maybe it’s one that you’re not familiar with, but in your mobile bug out bag you have in the car, you spent the time to make a DIY rope ladder. You have a serious mobility advantage now.
Rope ladders are lightweight, deployable, and above all else they’re versatile.
You don’t have to exclusively use them to gain the high ground (although that’s what they’re best for); you can use that prepper brain of yours to think up alternative uses and really solidify this rope ladder’s place in your bug out bag. This is how to make a rope ladder that will last.
What Type of Rope do You Need to Make a Decent Ladder?

The word “rope” is pretty vague when you consider all the different kinds that exist.
There’s no reason to cover every type of rope right now; just the ones that you’ll find yourself using in a rope ladder construction. This list is in no particular order; use whichever one of these you think will work the best.
Single-Braid Construction Rope
Used in pulleys and high-tension situations, this rope has some give and stretch to it, but proves to withstand the test of time over and over.
Single-braid rope is basically dirt cheap compared to some of these other ropes, and comes in high abundances. With this, you won’t have to worry about abaca splintering like you do with manila rope.
Plaited Braid Rope
Plaited rope is usually made from synthetic materials, and because of the braid pattern, it’s incredibly flexible.
That means it’s half-and-half when it comes to making rope ladders out of them. You should probably stretch this rope out before using it in a rope ladder.
Twisted Rope
This is an odd one, because it’s used on docks and for tow lines, but it’s also known as the splicer rope, or laid rope. Once you cut this vertically, it comes apart like little cotton fibers, but otherwise it holds up very well on its own.
With a good amount of stretch, this is best for rung loops instead of being drilled through dowels. Twisted rope is relatively cheap as well, so if you have big plans, you won’t need a big budget.
Manila
Manila comes from the abaca plant, although it can be made from hemp as well. Manila is great, durable, and doesn’t stretch or have much give, so for something sturdy like a roper ladder it serves well.
The problem is that it’s very heavy compared to nylon and polyester, so it increases your carry weight. Manila can be difficult to loop around ladder dowels, which is why you’ll find a lot of instructional material that shows that you should drill holes through your dowels to secure manila rope as a run-through.
Manila rope does have the issue of abaca splintering, which is when you get those small splinters in your hands when using very dried-out rope. Keep this in mind.
Polyester
Often hailed as the best all-purpose rope, polyester is ultra durable and a great pick for rope ladders. You’ll find that this has a very light amount of give, meaning it stretches slightly and has a bounciness to it (depending on the gauge of rope).
Polyester is rather inexpensive, so if you’re making a super long rope ladder or multiples to keep on-hand at your homestead, this will keep things budget friendly.
Nylon
While nylon is one of the best ropes out there, it does have a downside in rope ladders. Because nylon stretches a lot, your rope ladder rungs might end up being more spaced apart than you initially wanted.
The worst-case scenario here is that the rung loops become loose and potentially make your rope ladder unsafe. The remedy to this is to stretch out your nylon rope before using it. After it’s been stretched out a bit, it should hold its length and shape no problem.
Should You Use Wood?

Yes, you absolutely should. Presumably, you’re making this rope ladder now so you can store it in a bug out bag or keep it in a homestead. If you picture pulling out a pre-made rope ladder to apply to whatever situation you’re in, wooden rungs make the most sense.
You can make a ladder out of nothing but a long piece of rope, and while I have no doubt you have the dexterity to handle the lanky rungs (they can be difficult to climb on), you’re probably bringing your family along during an SHTF situation. How good are they at climbing?
Commanding a rope-rung ladder is much easier than using a rope-rung ladder.
You can find wooden dowel rods of varying size and depth at just about any hardware store. These will serve the best purpose for the wooden rungs of your ladder.
Can You Use 2×4’s for a Rope Ladder?
You can, but it’s going to come with some issues. Generally speaking, when you tie a timber hitch knot around wood (which is what we’ll be learning in a second), it benefits from having a perfectly circular surface to rest on.
2×4 rope ladders are usually done with something sturdy like manila rope, and run-throughs with knots on the underside of each 2×4 rung. It’s not something that I would recommend tying rope around.
How to Tie Rope to Make a Rope Ladder
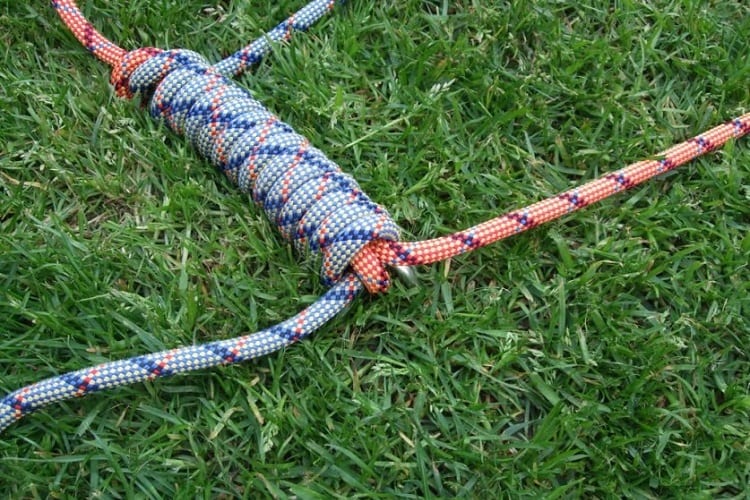
You’ll be using a timber hitch on the top of your ladder. While there won’t be a rung at the highest point of the ladder rope, you will have extra material to secure it to whatever you have around you, effectively anchoring it into place. To make a timber hitch, follow these instructions:
- Pull one piece of rope over the object you wish to anchor your rope ladder to. Pull it around so that your ladder is hanging off the front of the object (something like a branch or a cross-bar), and six to eight inches of rope is hanging off the back.
- Loop the rope around in a simple knot, but do not pull it tight. The end piece of the rope should be moving in the direction opposite the ladder.
- Provide two more loops going in the same direction to create a triple wrapping: three full rope wraps facing the same way.
- While holding the end of the rope, pull on the longer piece (connected to the ladder). Pull on this until the rope is tight. Pull on the end piece of the rope to ensure it’s not going anywhere, then tighten up the knot you’ve created from the bottom.
How to Tie Wood With a Rope to Make a Basic Ladder
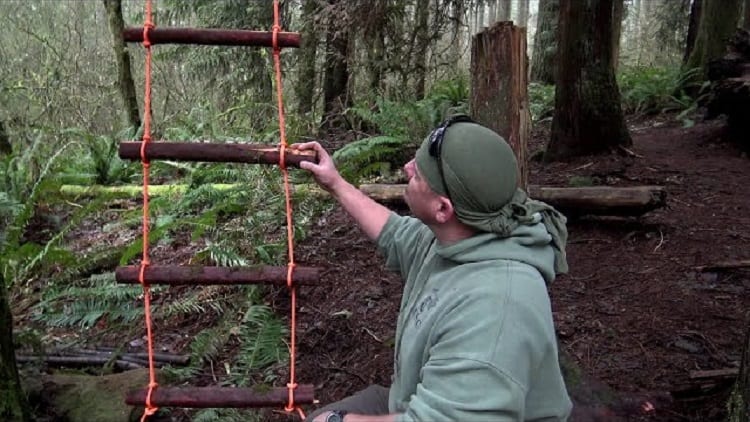
Two pieces of rope and as many dowel rods as you can possibly fit – that’s going to make the best rope ladder imaginable… if you know how to secure those dowel rods to the rope itself.
- Hang your rope up somewhere so that you can effectively make the ladder. The other option is to lay this all out in a vertical spread on the ground, but that will prove infinitely more difficult. If possible, make a timber hitch to secure your rope from something while you construct the ladder.
- While the rope hangs down, grab one side at the point where you want your top rung to go. Grab the rope with one hand with your thumb facing down.
- Once the rope is in your grap, turn your hand right-side up. You now have a loop of rope around your hand.
- Extend your fingers so the loop of rope is still around your hand. Reach your hand through the loop to grasp onto the hanging rope.
- Gentle pull the rope through without closing the loop. You should now have a space between the two pieces of rope (the loop and the hanging piece) to place your dowel. Run the dowel between these two pieces.
- Once the dowel is in the right position, pull down on the bottom portion of the hanging rope. Once pulled tight, your rope ladder has its first rung. Repeat the steps.
The best way to effectively do this is to use both hands at the same time and create even loops and have a friend run the dowel between them. You will find that some rungs need to be redone after your first attempt at making a rope ladder, mostly due to them being uneven.
Excellent Utility in All Situations
Rope ladders come in handy in so many situations, and when you really weigh the likelihood of how often you’ll use a rope ladder in the wilderness, it’s pretty fantastic.
Now you know how to make a DIY rope ladder and either bring it with you, or even make one out of the components that nature has left to you. Either way, you’re knowledgeable and equipped to handle come-what-may.


[lasso rel="emergency-preparedness-more-a-manual-on-food-storage-and-survival-2nd-edition-revised-and-updated" id="35334"]